https://www.wemakescholars.com/blog/step-by-step-guide-to-fill-the-ds-160-form-for-students
How to Fill the DS-160 Form for a Student Visa: Step-by-Step Guide
Abroad Education Loan | Updated on ()
Applying for a U.S. visa could be challenging, especially when filling DS-160 form. Filling out the DS-160 form is the first and crucial step in applying for a U.S. F-1 student visa. For many students, filling out this form is challenging, but worry not, we have got you covered.
DS-160 is an online application form that collects your personal, academic travel information. This blog will guide you through the step-by-step process of how to fill out a DS-160 form, its importance, along the documents that are needed for the same.
What is the DS-160 Form
- The DS-160 is an online application form that all non-immigrant visa applicants to the US must fill out. The applicants, including those applying for
-
F-1(student) visa,
-
B-1/B-2(tourist/business),
-
J-1(exchange visitor),
-
and other visa categories.
-
- The DS-160 form collects personal, educational, and travel information and connects directly to your visa application. This acts as the official record of the immigrant's intent to travel to the United States for temporary non-immigrant purposes such as study, visits, etc.
- This is connected directly to your SEVIS(Student and Exchange Visitor Information System)record, which tracks international students in the US. This generally becomes a part of your visa profile throughout your journey.
- Filling out this form is not just mandatory, but also the first step in your student visa process. The information that you provide in this form is used to determine your eligibility for a US visa.
Key Facts about the DS-160 Form
It's an Online Form: you are not required to submit a paper version. The form must be completed and submitted through the U.S. Department of State website. Make sure to use the updated version of your browser.
DS-160 is for most non-immigrant visas: Not just for tourist visas DS-160 form is to be filled out by many other visa types as well.
Expect an Interview: Most applicants are required to attend the interview at a U.S. embassy or consulate.
Save your details often: The system times out after 20 minutes of inactivity. You can save and return later, but remember the form itself cannot be reused for future applications.
Official instructions available: You can find and follow the detailed instructions on how to fill out the DS-160 on the State Department's website.
Why is the DS-160 Form Important for an F1 Visa
- The DS-160 form is important for an F-1 visa because it is the official application that allows students to schedule a US visa interview. It is not possible to proceed with the F-1 visa process without submitting this form.
- This form gives the US embassy all the important details about your identity, academic plans, and travel purpose. It is directly connected to your SEVIS ID and Form I-20, enabling the US government to track the student's status and university admission.
- Generally, visa officers mostly rely upon this information to decide whether you qualify for a student visa; any mistakes or mismatches can affect your visa approval. For this reason, students need to fill out the DS-160 accurately and completely to avoid visa delays and rejection.
What is the cost of the DS-160 form?
Generally, there is no specific fee to fill out the DS-160 form alone. However, you must pay a processing fee for the specific visa you are applying for. This fee varies depending on the visa type and can be found on the U.S. Department of State website.
Who requires a DS-160 Form?
Every visitor, including a child, needs to fill out their own DS-160 form. If an applicant is 16 or younger or physically not able to complete the form themselves, then a third party can help them. That person must be identified at the end of the DS-160 Form, on the signature and submit page.
Below are some common non-immigrant visa types that require a DS-160 Form.
- B1/B2 Visitor Visas: For Individuals travelling to the United States temporarily for business (B-1), tourism, or medical treatment purposes(B-2), or a combination of both(B1/B2).
- K Visas: For fiancés and spouses of citizens well as their children.
- F-1 and M-1 Visas: For students pursuing academic or vocational studies in the US.
- J-1 Visas: For exchange visitors participating in cultural and educational programs.
- H-1B Visas: For working professionals.
- L-1 Visas: For Intracompany transferees.
- O-1 Visas: For individuals with extraordinary ability or achievement.
- P Visas: For athletes, artists, and entertainers.
DS-160 Processing Time
- There is no processing time for the DS-160 Form. Once you fill out and submit the form, you will receive a confirmation page with a barcode. Make sure to keep a copy of this, as you have to bring it to your visa interview.
- If the application is approved during the interview, the average processing time for a travel visa is 7-10 working days, plus time for delivery.
- The processing time varies by embassy or consulate location, so it is important to check your specific service centre for the most up-to-date information.
DS-160 Form Eligibility
Below are the basic eligibility requirements to fill out the DS-160 Form.
- Visa Status: Must be applying for a non-immigrant visa
- Passport: Must have a valid passport
- Digital Photo: Recent digital photo
- Personal Information: Personal Information information including travel itinerary and history of past five trips.
- Education and Work History: Information from your Resume or CV, including current and previous, along with education details.
- Social Media accounts: Information on social media accounts that you have used in the past.
- Depending on the Visa, other Specific Documents and Information.
Documents Required for DS-160 Form Filling
Before you fill out the DS-160 form, it is recommended to keep all the required documents and other details with the applicant. Documents related to personal, academic, travel, and other information. It is extremely important to stay accurate with all your academic and other official records.
Here’s the basic list of documents that are required for filling DS-160 form
1. Valid Passport
A passport is mandatory to fill out the DS-160 form. It is important to make sure that the passport is valid for at least six months beyond the intended stay in the United States.
2. Form I-20
This form contains your SEVIS ID, university address, and the programme details issued by the university that you are applying to.
3. SEVIS Fee Receipt
Receipts as proof of payment that you have made the SEVIS fee(USD 350 or INR 29,300 approx.). You are required to provide the confirmation number on the DS-160 Form.
4. Visa Application Fee(MRV) Receipt
Keep the receipts of your visa application fee payment (USD 185 or INR 15,500 approx). This is required when scheduling your visa interview.
5. Photograph(As per US Visa guidelines)
The photo must meet the US visa specifications. It must be a recent, colour photo with a white background.2*2 inches in size.
6. Academic History
Name and addresses of all the schools, colleges, and universities that you have attended. Add start and end dates, qualifications earned, and the major subjects.
7. Work Experience(If applicable)
If you have worked previously, keep ready with the information of job titles, the employer's name, location, and dates of employment.
8. Family Details
You are required to provide the names, dates of birth, and nationality of your parents. Even if they don't live with you.
9. US Contact Information
This includes a US-based contact person or the international office of your university(as mentioned on your I-20).
10. Financial Information
You may be asked to provide documents that prove your financial ability to support yourself while studying in the US. This could be bank statements, scholarship proofs, or a letter from a sponsor, etc
How to Fill DS-160 Form
Now that you know what documents are required to apply for the DS-160 form. Let us now understand how to fill out DS-160.
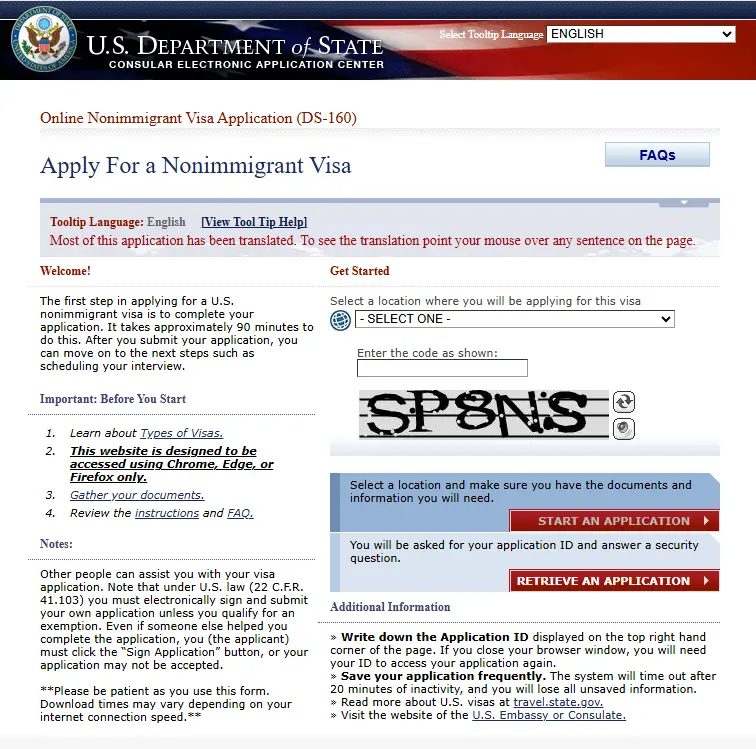
Step 1: Visit the Consular Electronic Application Centre website to start applying for your DS-160 Form.
Step 2: Once you find the Apply for a Non-immigrant page, select the location and enter the given captcha. Select Start an application if you start your new application. Or select Retrieve an application if you already have an application number.
Step 3: The first section is to fill in the security question. The security question is the same for everyone, i.e, the name of your mother’s mother provided in the security question options. Along with five letters of the surname and the Year of Birth.
Step 4: The next two pages are to fill in your personal details. This includes your name, address, and phone number, date of birth, gender, marital status, etc. In addition, some personal information where you have to select between yes or no options.
Step 5: In the Personal Information page, you have to fill details of the country, region of origin, residential details, etc.
Step 6: Then comes the travel section, where you have to submit the details of your travel, like the purpose of the trip, travel plan, etc. This includes the intended date of arrival and, intended length of stay in the US.
Step 7: The Travel Companions' Information section contains the persons travelling with you, travelling in a group or organisation, and details of the members.
Step 8: The next section is the previous US travel information, like whether you have been in the US, or have you ever held a US driver's license, or have you ever been issued a US visa, have your visa ever been lost or revoked, refused a US visa, or refused admission to the United States.
Step 9: Address and Phone Information, including Home address, mailing address, alternative mailing address details, Social media account details, etc.
Step 10: Next section, you are required to provide your passport details, which include your passport number, the country that issued your passport, etc., details of have yoy ever lost your passport, etc. It is recommended to double-check your passport information to stay accurate.
Step 11: The next section is the US point of contact information, such as the contact person or organisation, and the relationship to you, details, and address information.
Step 12: Later, you are required to provide information about your family. This includes your family members' relatives, spouse, partner, Fiancé, former spouse, deceased spouse names, date of birth, occupation, etc. details of children.
Step 13: Next comes the present work/education/ training information details. Fill in the occupation details, along with the employer details, previously employed details. Specialised skills details, etc. Fill in your education details, which include the name and details of the educational institutions that you have studied.
Step 14: In this step, you will answer the security questions, which could be about your security background, health history, travel history, and criminal history etc.
Step 15: Fill in the E-Visa details. For student visas, you are required to provide SEVIS ID details, additional information about your intended program of study, and your address. This includes the name and location of the university and any other information as required.
Step 16:The final step is to upload and confirm the application by uploading a valid photo.
Step 17:This is the crucial step. Before submitting your DS-160, take the time to review all the information that you have entered is accurate, complete, and truthful. Make changes if required. Once you are satisfied, click Sign and submit.
Mistakes to avoid
- Incorrect information: Ensure all the information that you provide is accurate and true, supported with valid documents, such as your passport. Even a small mistake, such as a spelling error, birthdays, etc, can cause delays or even rejections.
- Rushing through the form: Take your time to review each section carefully. Use the save feature to avoid losing progress.
- Not saving the Confirmation Number: The DS-160 confirmation number is very important for booking your visa appointment. Make sure to save it or print the confirmation page immediately after submission.
- Using Outdated Photos: Make sure to upload the photo as per the US visa requirements. A poorly shot or low-quality photo can lead to rejection of the form.
- Leaving out some information: Do not leave any blank unless it is explicitly marked as optional. Missing or incomplete information can result in a delay or resubmission of the form.
- Submitting the form too early or too late: Submit the form at the correct time. Being too early or too close to your visa interview can create scheduling issues or may require updating the information if it changes.
Helpful Tips
- Save your application ID and security question answers early, so that you do not forget and can use the form later. This is because the form itself cannot be reused for future applications.
- Make sure to save your work often, as the system will time out after 20 minutes.
- You can save and return to it later as you complete the DS-160 form process within 30 days.
- Better to download a copy to your computer if you need more than 30 days to complete it.
- Once you complete one DS-160, you can create family applications that autofill shared details. This makes filling out the form a little easier.
Conclusion
Filling out the DS-160 Form is quite challenging at first, but with proper guidance, students can easily fill out the form. In this blog, we have provided a clear step-by-step process of how to fill out a DS-160 Form, along with the documents that are required. A double check can always help students avoid mistakes and rejections.


Kindly login to comment and ask your questions about Scholarships & Education Loans